| art supplies | framing | gallery |
| art supplies | framing | gallery | |
||
|
| main page | framing | services | project ideas | products | location & hours | |
 |
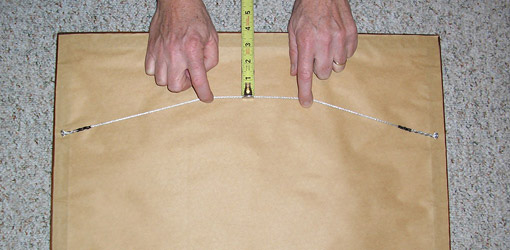
Picture Hanging InstructionsNow that you have invested in quality custom framing for your artwork, memorabilia, or other cherished item, you'll likely want to get it up on the wall so that you can start enjoying it. We encourage you to take a moment to review these hanging instructions to ensure that your newly framed piece is properly mounted for the long term. What you'll need:When you pick up your work from Art Placement's frame shop, hanging hardware will already be installed on the frame. In some cases, d-hooks (also called hinge hangers) will be attached to the frame or strainer, threaded with braided steel wire. In other cases, usually for works that are exceptionally large or heavy, there will only be d-hooks mounted to the back of the frame. If the back of the work does not have wire pre-attached, you should hang the work directly from the d-hooks. Though wire is often preferred, and easier to level and adjust, when only d-hooks are present, it is for a reason, and we strongly recommend that you hang directly from them. DO NOT thread the d-hooks with your own wire or braided steel cable, especially if the d-hooks that have been installed have more than one screw per hook. Wiring multi-screw d-hooks puts tremendous strain on the hooks, greatly increasing the chances that the frame may split and come crashing to the ground. Included with your newly framed work will also be a small plastic bag that contains hanging hooks, nails, and rubber bump-ons. Each pack contains two hooks and nails. Even for small scale works, we highly recommend that you use both hooks. The work will be much more stable, and easier to level. In addition to the hardware that has been installed and provided, you will also need: a hammer, a pencil, an eraser, and a measuring tape. You may also find low-tack painter's tape, and a level to be useful, though they are not always necessary. In addition to these tools, it is also great to have someone to lend a hand. Small scale works may be easily installed by only one person, but for anything large or heavy, it is usually a two-person job. Hanging from the WireIf your picture has been wired, follow these instructions to hang it on the wall. 1. Determine the height that the picture will hang at. This is always one of the most difficult parts of the hanging process. As a rule of thumb, in most galleries works are hung at a uniform height of somewhere near 56 inches to centre. This means that the vertical mid-point of all pictures, regardless of size, will measure 56 inches from the ground. In a home setting, there are often other factors to take into consideration, including the height of furniture, ceiling heights, the placement of light switches and fixtures, and the location and placement of other works in the room. It is often a good idea to have a helper hold the work in place at various heights, and assess what feels comfortable and pleasing to your eye. Utlimately, you have to be happy with how it looks! In terms of horizontal placement, many of the same factors will apply. Sometimes you will want to place a work centred on a wall, or above a piece of furniture, though there will often be other factors to consider as well. Decide what suits your particular situation, and take a measurement from a fixed reference point to note the placement, for example: the right edge of the picture may be 36 inches from the corner of the wall, and the bottom edge is 33 inches from floor. You may also choose to make light pencil marks on the wall itself to serve as reference points, or apply small pieces of low-tack painters tape to serve the same function. 2. Now that you have decided on the height of the picture, it is time to calculate the placement of your hanging hooks. Using your reference points or measurements, it is time to take some measurements from the picture itself and do some simple math. Your precise measurements and calculations will vary somewhat depending on the location of your reference points, but we suggest working from the height of the top of the picture, and it's horizontal centre. These values can always be calculated no matter the location of your reference points. For example: if you have measured the right edge of the picture to be 36 inches from the corner, and the picture is 20 inches wide, the horizontal centre of the picture will be 46 inches from the corner (36 inches + 10 inches, which is half of the picture width). To figure out the height of the top of the picture, you may choose to use the top as a reference point, simply placing a mark on the wall at the top of the picture, and measuring up from the floor. If you have marked the height of the bottom of the picture as your reference point, simply add the height of the picture to know where the top will be, for example: If the bottom of the picture is 32 inches from the floor, and the picture is 40 inches tall, the top of the picture will be 72 inches from the floor. If you intend to hang the picture based on a pre-determined vertical-centre height like 56 inches, you can calculate the height of the top of the picture by adding half of the height of the picture, to the pre-determined centre height, for example, if you want your picture to be centred at 56 inches from the floor, and the picture is 32 inches tall, the top of the picture will be 72 inches from the floor (56 inches + 16 inches, which is half the height of the picture). Now it is time to measure the back of the picture to determine the distance from the top of the picture to the wire. Hold the wire taught, and level, at two points equal distance from the horizontal centre of the picture (if that sounds confusing, see the image below). Remember, it is recommended that you use two hanging hooks. The hooks should be set a reasonable distance apart to spread out the load, and for greater stability. Imagine the width of the picture approximately divided into thirds, with the distance between the two hangers being approximately equal to the distance of each hanger to the edge of the picture. Have a second person measure the distance of the top of the wire to the top of the picture. Also have them measure the distance between your fingers, as this will be the distance between the two hanging hooks.
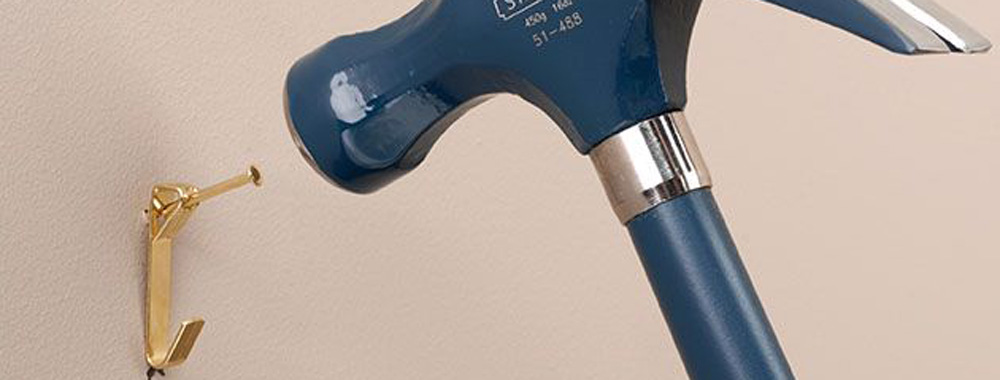
3. Now that you've got all your measurements, do the calculations, and mark the position of the hanging hooks on the wall. Calculate the height of the hooks by subtracting the distance between the top height of the picture and the top of the wire, for example, if you know that the final height of the picture on the wall will be 72 inches from the floor, and the taught wire is 4 inches down from the top of the frame, the hanging hooks will be 68 inches up from the floor (72 inches - 4 inches). Calculate the horizontal positions of the hanging hooks by offsetting from the centre of the picture, half the distance between the two hooks. For example, if you have measured the distance between the hanging hooks to be 12 inches (remember: that is the distance between your fingers), and you have marked the horizontal centre of the picture at 46 inches from the corner, measure 6 inches to the left and 6 inches to the right of the centre mark. Or, if you have not marked the horizontal centre of the picture, but know that it will be 46 inches from the corner, mark the wall 40 inches from the corner (46 - 6), and 52 inches from the corner (46 + 6) to find the horizontal positions of the hanging hooks. Now mark the vertical height of the hooks, measuring up from the floor at each horizontal mark. The points where these two marks intersect indicates the positions of your hanging hooks. Using a hammer, mount the hooks so that the hook is centred on the horizontal reference mark, and the bottom of each hook lines up with vertical reference marks. Special Note: In most houses, very few elements are perfectly level. When using these as reference points, keep in mind that any deviation from level and plumb will carry over as well. This is why you may want to use a level. After you have marked the vertical positions of your hanging hooks, use a level to see if those marks line up. In most cases, the floor will be the reference point from which you have measured up the wall. If the floor is not perfectly level, your marks will not be perfectly level either. When you hang from a wire, this is not a major concern. The wire will allow you to adjust the picture so that it is level, even if the hanging hooks are not. If it is important to you that the hooks are perfectly level, before hammering nails into the wall, simply use a level and adjust your marks accordingly. If it doesn't matter to you that the hooks may be slightly off, go ahead and hammer away; you will be able to adjust the picture afterwards. In our experience, sometimes it is actually better to NOT hang a picture perfectly level. In older, historic homes, for example, walls, floors, and ceilings may look perfectly square, but can sometimes be dramatically un-even. If you hang a picture perfectly level near a ceiling line that is not level, things can look out of whack! This is one of the great benefits of hanging on a wire. Once you get the picture up, you can tweak and adjust it as you see fit, so that it "looks" right. Sometimes that will mean making it perfectly level, and other times it will mean tilting it ever so slightly to compensate for architectural irregularities. 4. You are now almost ready to hang the picture! Before hanging, you may want to attach the rubber bump-ons to the corners of the picture before placing it onto the hooks. Simply peel the bump-ons off of the sheet they are attached to, and stick them onto the back corners of the frame. Your hanging pack will include 4 bump-ons, one for each corner of the picture. You may choose to only use two, on the bottom corners. Bump-ons slightly "grip" the wall and help to keep the picture stable. They also reduce the likelihood that elements on the back of the picture (like d-hooks and braided wire) will mark or scratch the surface of the wall. Most wall finishes are pretty tough, but if you happen to have delicate wallpapers or paint finishes, this may be a concern. It is now time to hang the picture. Once again, and especially for large works, we highly recommend hanging the work with help from a second person. Each person lifts one side of the picture. With one hand securely gripping the bottom of the frame, you can both reach behind the picture with your other hand, grip the wire, and seat it securely into the hooks. Keeping your hand on the bottom of the picture, gently lower it down, making sure that the wire is correctly placed. You should be able to lower your hand away, with the hooks taking over. If the picture continues to lower with your hand, it is probably not correctly seated in the hook. Hanging from the D-HooksIf your picture has not been wired, it is probably for a reason. As a general rule, works that are very heavy or very large should be hung directly from the D-hooks. D-hooks are stronger and more stable than braided steel wire, which can be cut, abraded, and even unravelled when strained. The basic process for hanging from d-hooks is much the same as hanging from a wire; it is all about determining position, marking reference points, and calculating the position of the hangers with respect to the locations of those references. Read on for more detailed instructions. 1. Determine the height that the picture will hang at. This is always one of the most difficult parts of the hanging process. As a rule of thumb, in most galleries works are hung at a uniform height of somewhere near 56 inches to centre. This means that the vertical mid-point of all pictures, regardless of size, will measure 56 inches from the ground. In a home setting, there are often other factors to take into consideration, including the height of furniture, ceiling heights, the placement of light switches and fixtures, and the location and placement of other works in the room. It is often a good idea to have a helper hold the work in place at various heights, and assess what feels comfortable and pleasing to your eye. Utlimately, you have to be happy with how it looks! In terms of horizontal placement, many of the same factors will apply. Sometimes you will want to place a work centred on a wall, or above a piece of furniture, though there will often be other factors to consider as well. Decide what suits your particular situation, and take a measurement from a fixed reference point to note the placement, for example: the right edge of the picture may be 36 inches from the corner of the wall, and the bottom edge is 33 inches from floor. You may also choose to make light pencil marks on the wall itself to serve as reference points, or apply small pieces of low-tack painters tape to serve the same function. 2. Now that you have decided on the height of the picture, it is time to calculate the placement of your hanging hooks. Using your reference points or measurements, it is time to take some measurements from the picture itself and do some simple math. Your precise measurements and calculations will vary somewhat depending on the location of your reference points, but we suggest working from the height of the top of the picture, and it's horizontal centre. These values can always be calculated no matter the location of your reference points. For example: if you have measured the right edge of the picture to be 36 inches from the corner, and the picture is 20 inches wide, the horizontal centre of the picture will be 46 inches from the corner (36 inches + 10 inches, which is half of the picture width). To figure out the height of the top of the picture, you may choose to use the top as a reference point, simply placing a mark on the wall at the top of the picture, and measuring up from the floor. If you have marked the height of the bottom of the picture as your reference point, simply add the height of the picture to know where the top will be, for example: If the bottom of the picture is 32 inches from the floor, and the picture is 40 inches tall, the top of the picture will be 72 inches from the floor. If you intend to hang the picture based on a pre-determined vertical-centre height like 56 inches, you can calculate the height of the top of the picture by adding half of the height of the picture, to the pre-determined centre height, for example, if you want your picture to be centred at 56 inches from the floor, and the picture is 32 inches tall, the top of the picture will be 72 inches from the floor (56 inches + 16 inches, which is half the height of the picture). Now it is time to measure the back of the picture to determine the distance from the top of the picture to the d-hooks. At each side of the picture, simply measure down from the top of the picture to the top of the INSIDE of the d-hook. This distance should be the same on either side, but measure to confirm. If the d-hooks are slightly off, you can either compensate in your calculations, or if you are confident that you can accurately re-position the d-hook, that is another option. You will also need to establish the horizontal positioning of the d-hooks. To do this, simply measure the distance between the centres of the d-hooks. Half of this distance is the distance of each d-hook from the centre of the painting. 3. Now that you've got all your measurements, do the calculations, and mark the position of the hanging hooks on the wall. Calculate the height of the hooks by subtracting the distance between the top of the picture and the top of the d-hook, for example, if you know that the final height of the picture on the wall will be 72 inches from the floor, and each d-hook is 10 inches down from the top of the frame, the hanging hooks will be 62 inches up from the floor (72 inches - 10 inches). Calculate the horizontal positions of the hanging hooks by offsetting from the centre of the picture. For example, if you have measured the distance between the d- hooks to be 36 inches and you have marked the horizontal centre of the picture at 46 inches from the corner of the wall, measure 18 inches to the left and 18 inches to the right of that centre mark. Or, if you have not marked the horizontal centre of the picture, but know that it will be 46 inches from the corner of the wall, mark the wall 28 inches from the corner (46 - 18), and 64 inches from the corner (46 + 18) to find the horizontal positions of the hanging hooks. Now mark the vertical height of the hooks, measuring up from the floor at each horizontal mark. The points where these two marks intersect indicates the positions of your hanging hooks. Using a hammer, mount the hooks so that the hook is centred on the horizontal reference mark, and the bottom of each hook lines up with vertical reference marks. Special Note: In most houses, very few elements are perfectly level. When using these as reference points, keep in mind that any deviation from level and plumb will carry over as well. This is why you may want to use a level. After you have marked the vertical positions of your hanging hooks, use a level to see if those marks line up. In most cases, the floor will be the reference point from which you have measured up the wall. If the floor is not perfectly level, your marks will not be perfectly level either. When you hang from d-hooks, there is no room for minor adjustments as there would be with a wire: the height of the hanging hook is fixed. If it is important to you that the hooks are perfectly level, before hammering nails into the wall, simply use a level and adjust your marks accordingly. If it doesn't matter to you that the hooks may be slightly off, go ahead and hammer away. In our experience, sometimes it is actually better to NOT hang a picture perfectly level. In older, historic homes, for example, walls, floors, and ceilings may look perfectly square, but can sometimes be dramatically un-even. If you hang a picture perfectly level near a ceiling line that is not level, things can look out of whack! For this reason, you may want to consider keeping your hanging hooks slightly uneven if it means that the picture will be square with the floor and ceiling. Unfortunately, if there are any minor adjustments needed, it means moving the d-hooks or the hanging hooks. Use your best judgment before hammering in a nail, but don't worry if a little tweaking is necessary. Once you get the picture up, you can assess whether any adjustments are needed so that it "looks" right. Sometimes that will mean making it perfectly level, and other times it will mean tilting it ever so slightly to compensate for architectural irregularities. 4. You are now almost ready to hang the picture! Before hanging, you may want to attach the rubber bump-ons to the corners of the picture before placing it onto the hooks. Simply peel the bump-ons off of the sheet they are attached to, and stick them onto the back corners of the frame. Your hanging pack will include 4 bump-ons, one for each corner of the picture. You may choose to only use two, on the bottom corners. Bump-ons slightly "grip" the wall and help to keep the picture stable. They also reduce the likelihood that elements on the back of the picture (like d-hooks and braided wire, but also the potentially sharp corner of the frame) will mark or scratch the surface of the wall. Most wall finishes are pretty tough, but if you happen to have delicate wallpapers or paint finishes, this may be a concern. It is now time to hang the picture. Once again, and especially for large works, we highly recommend hanging the work with help from a second person. Each person lifts one side of the picture. With one hand securely gripping the bottom of the frame, you can both reach behind the picture with your other hand, grip the d-hook, and seat it securely into the hanging hooks. Keeping your hand on the bottom of the picture, gently lower it down, making sure that the d-hook is correctly placed. You should be able to lower your hand away, with the hooks taking over. If the picture continues to lower with your hand, it is probably not correctly seated in the hook. |
| The GALLERY / art placement inc. 228 - 3rd avenue south, saskatoon, SK, canada, S7K 1L9 |
  |
|
p: 306.664.3385 f: 306.933.2521 |
© all images, text, and site design |